Flip Flops at Water's Edge Tutorial
Materials and Set-Up for Your Summer Paint & Sip
To fully enjoy our “Final Summer Paint & Sip Tutorial: Flip Flops at the Water's Edge,” proper organization and preparation of your materials are key. Begin by gathering essential items such as acrylic paints in hues reminiscent of summer—think vibrant blues, calming greens, and sunny yellows. Acrylic paints are preferred for their quick-drying properties and ease of use. Make sure to have quality brushes in various sizes: a wide flat brush for broad strokes, a medium round brush for detailing, and a fine liner brush for intricate designs. These will help bring your summer scene to life with precision and flair. I give the list of colors and brushes/tools used in the video!
A standard 11x14inch canvas serves as an ideal foundation, offering ample space to capture the beachy motif. Pre-stretched and primed canvases are highly recommended to ensure a smooth painting experience. Additional items such as a paper plate for mixing colors, an apron to protect your clothing, and a couple of water cups for rinsing your brushes are also fundamental.
Setting up your painting space is equally important. Opt for a well-lit area, whether it's natural sunlight streaming through windows or bright, overhead lighting, to ensure proper visibility of your work. Arrange your easel at a comfortable height and angle to prevent strain during the creative process. Keep your materials within easy reach to facilitate a smooth workflow; organizing your brushes and paints on a side table can keep your primary workspace uncluttered. Choose what is most comfortable for you. My painting table is raised so I'm not bending over.
By meticulously preparing your materials and setting up a conducive environment, you're ensuring that your “Final Summer Paint & Sip” experience focusing on painting flip flops at the water’s edge will be both enjoyable and successful.
Step-by-Step Painting Tutorial: Flip Flops at the Water's Edge
Painting a summer-themed picture featuring flip flops at the water's edge can be an enjoyable and fulfilling experience. To begin, gather all necessary materials, including a blank canvas, an assortment of brushes, a palette for mixing colors, and your chosen set of acrylic paints.
Step 1: Sketching the Basic Outline
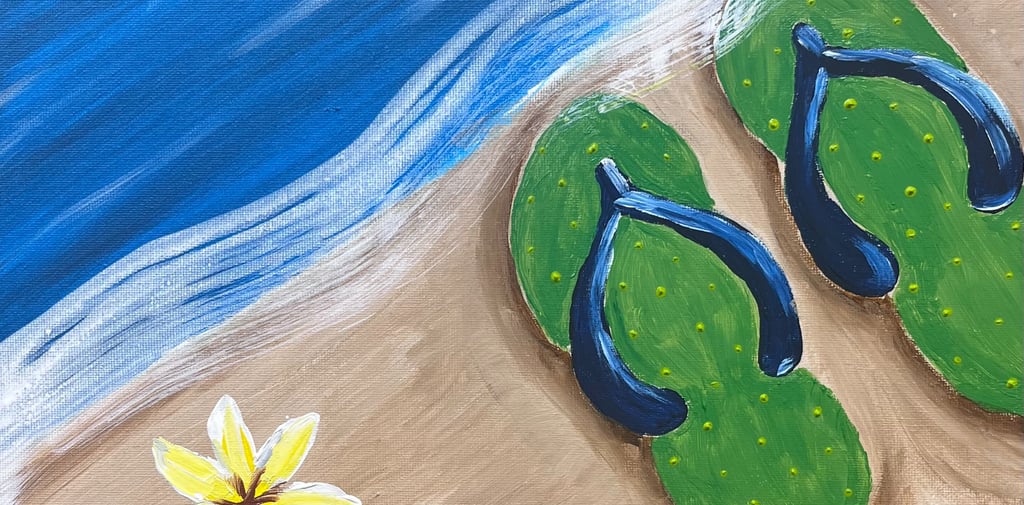
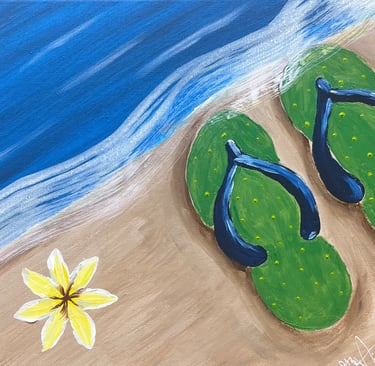
Start by lightly sketching the outline of your flip flops. Position the flip flops at the foreground, slightly angled on the right side of the canvas. I have the canvas positioned horizontally. I looked up template on google to use. I penciled on the back side of the template then turned it right side over and penciled over it again to get the outline onto the canvas. The rest of the composition will fall into place as we go.
Step 2: Choosing and Mixing Colors
Next, select your color palette. I have the list of colors I used on the video. For a vivid and realistic portrayal, opt for shades of blue and turquoise for the water, sandy beige and brown for the shore, and vibrant hues for the flip flops. Place the colors you choose on your paper plate. I put them around the edge so I can use the center of the plate for mixing.
Step 3: Laying the Base Layers
Begin by filling in the background. Use a broad brush, I like a fan brush for this, for blending the colors to create a gradient effect. For example, as you paint the water, blend different shades of blue to capture the movement and depth. I like to work with the paints still wet to get a more blended look. Also, keep your brush wet. You will seperate the water and the sand as a diagonal through the canvas. The top being the water and the bottom, the sand. Don't worry about where they come together as after painting the flip flops we will add a final detail!
Step 4: Painting the Flip Flops
Focus on the flip flops by painting their base color first. You should still be able to see your stencil marks on the canvas. Once dry, add shadows and highlights to give them dimension. Consider the light source and apply darker shades where shadows naturally fall. Add straps and any decorative patterns using a fine-tipped brush for precision. You'll see in the video I did dots on the flip flops, you can use a q-tip for this or tooth pick.
Step 5: Final Touches
After completing the flip flops, it's time to add shadows and lights. Decide how you want the light source to come over your painting. Mine is coming from the right side. So I used white to give highlights on the straps. I also created shadows around the flip flops, making it darkest on the left sides. I like to work quickly here so the paint does not dry and allows an easier blending.
Review your painting and add any final touches. Ensure that the elements harmonize well together. Highlights on the water’s surface, footprints in the sand, or additional small details can enhance the overall effect. I added a pretty tropical flower to the bottom left corner. You could make it a seashell or any type of flower you'd like.
Once you've completed the scene, you will grab some titanium white and water and a fan brush. Mix just the tiniest amount of white paint with a maybe a teaspoon of water. We want this just to add a hint of white on the painting and be very transparent. This is going to be the foam at the edge of the water. You will make one or two swipes over the area where the water meets the sand. I did mine slightly wavy. It's important to not go over this with too many strokes as then it will become a solid color instead of transparent. This will cover the tips of the flips flops as well.
By following these steps and integrating your unique touch, you can create a captivating scene of flip flops at the water's edge that encapsulates the essence of summertime. Enjoy the process and let your creativity flow!
Tutorial Video:
As always, I want to see your creations. If you feel brave to share on social media, tag me @artbyaimeecarlson!! You can email me your paintings too at aimee@artbyaimeecarlson.com
Happy Painting!
Aimee
Subscribe and get instant savings!
I invite you to immerse yourself in the stories that bring my original pieces to life. As a token of appreciation, I am delighted to offer you an exclusive instant savings code. Unlock the opportunity to own a piece of my artistic vision while enjoying a special discount.