Creating Magical Northern Lights with Acrylic Pour Paints: A Fun Tutorial
Introduction to Acrylic Pour Painting
Have you ever gazed at the night sky and wished you could capture the mesmerizing beauty of the Northern Lights? Well, now you can, using a fun and easy technique called acrylic pour painting. This method is not only beginner-friendly but also perfect for a creative activity with the grandkids! In this tutorial, I'll guide you through the steps to create your very own Northern Lights masterpiece using the swipe technique. I've linked a video where I'm doing this painting so you can see how it's done as well. Let's get started!
Gathering Your Supplies
Before diving into the painting process, let's make sure we have all the necessary supplies. Here's a list of what you'll need:
Acrylic pour paints in various colors (black, blue, green, yellow, white, etc.) I Love this kit for this painting!
Background color- Black is Perfect
Canvas - I recommend an 11x14
Almost forgot, swipe color silver
Paper Towels
Plastic table cloth to protect work area
Gloves and aprons (things can get a bit messy!)
Push pins to raise your canvas
Toothpick for popping bubbles
If you want to add in the trees like my picture, then you will also need black acrylic paint (NOT POUR PAINT) and a fan brush. I used a size 4.
Setting Up Your Workspace
Preparation is key to a successful painting session. Lay down your plastic table cloth to keep your workspace clean. Set up your canvas on a flat surface, and make sure you have all your supplies within reach. Now, it's time to paint.
Creating the Northern Lights Effect
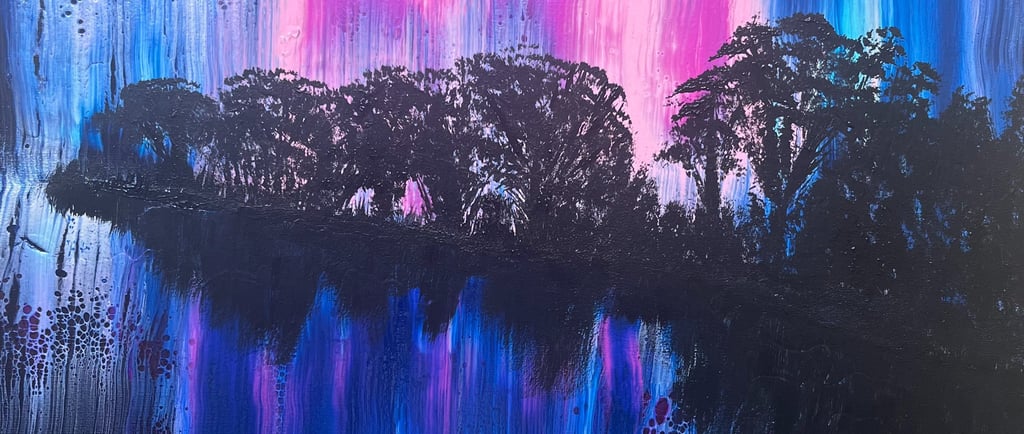
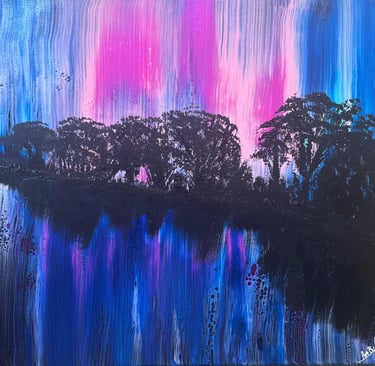
Once your paints are ready, pour a base layer of black paint onto your canvas and spread it out evenly. You can use your hands for this to make sure you evenly spread this out. Make sure to get your sides. This will represent the night sky. Then, start pouring your colors in horizontal lines across the canvas. Don't worry about being too precise – the beauty of acrylic pour painting lies in its unpredictability! You'll see in the video, I layered mine. Once you have all the colors on, you'll cover them with a line of the silver metallic.
Now, comes the exciting part – the swipe technique. Using a piece of paper towel, gently swipe the paint across the canvas from your center line upwards. This will blend the colors and create the flowing effect of the Northern Lights. You can swipe multiple times to achieve the desired look. Just remember to be gentle to avoid muddying the colors. You'll do the entire top side, then do the bottom half. You'll see what I mean when you watch the video.
Adding Finishing Touches
Once you're satisfied with the swiping, let your painting dry completely. This could take anywhere from a few hours to a day, depending on the thickness of the paint. Once dry, you can add some final touches like stars or silhouettes of trees using a fine brush and white paint for stars or black paint for the silhouette of trees. In my painting I did a tree line against the lake and the shadows of the trees in the water.
To create stars, you can simply add white paint to your fan brush and then use a finger to gently pull against the brush bristles to splatter the white.
For the tree silhouettes, I simply create a black ground with the paint swiping the brush across the canvas in desired area. Next, create some tree trunks by using the brush held vertically. After your satisfied with the tree trunks, add in the leaves by tapping on the canvas with the brush held horizontally. This creates a nice tree!
Video
This is the video of me doing the painting, talking you through each step!
Conclusion
And there you have it – a stunning depiction of the Northern Lights created with the acrylic pour painting technique. This project is not only a wonderful way to spend creative time with the grandkids but also a fantastic opportunity to make cherished memories. So, gather your supplies and let the magic of the Northern Lights inspire your next painting adventure!
I want to see your finished projects!!
Subscribe and get instant savings!
I invite you to immerse yourself in the stories that bring my original pieces to life. As a token of appreciation, I am delighted to offer you an exclusive instant savings code. Unlock the opportunity to own a piece of my artistic vision while enjoying a special discount.